DIY Mother Daughter Stenciled Apron Pattern (+ Cut File)
This DIY Mother Daughter Stenciled Apron Pattern is perfect for creating cute, matching aprons with easy steps and a free pattern guide! Create adorable matching mom and daughter aprons with this easy DIY tutorial!
Today I’m excited to be sharing a sewing project that was on my list for a long time! I finally made these cute mommy and me coordinated aprons.

Table of Contents
Marching Aprons For Mom And Daughter
I got inspired to make this type of apron tutorial by Sew 4 Home and I must confess, this was quite a challenge in both ways: I had never made an apron before and I made 2 in different sizes from one single pattern. Though I have to say, it wasn’t that difficult in the end.
This post may contain affiliate links. Please read our Disclosure Policy.
I started with mine and once I finished it and everything was good, then I started my girl’s one. I just reduced it proportionally using some measures as a reference.
Craft Fail Storytime
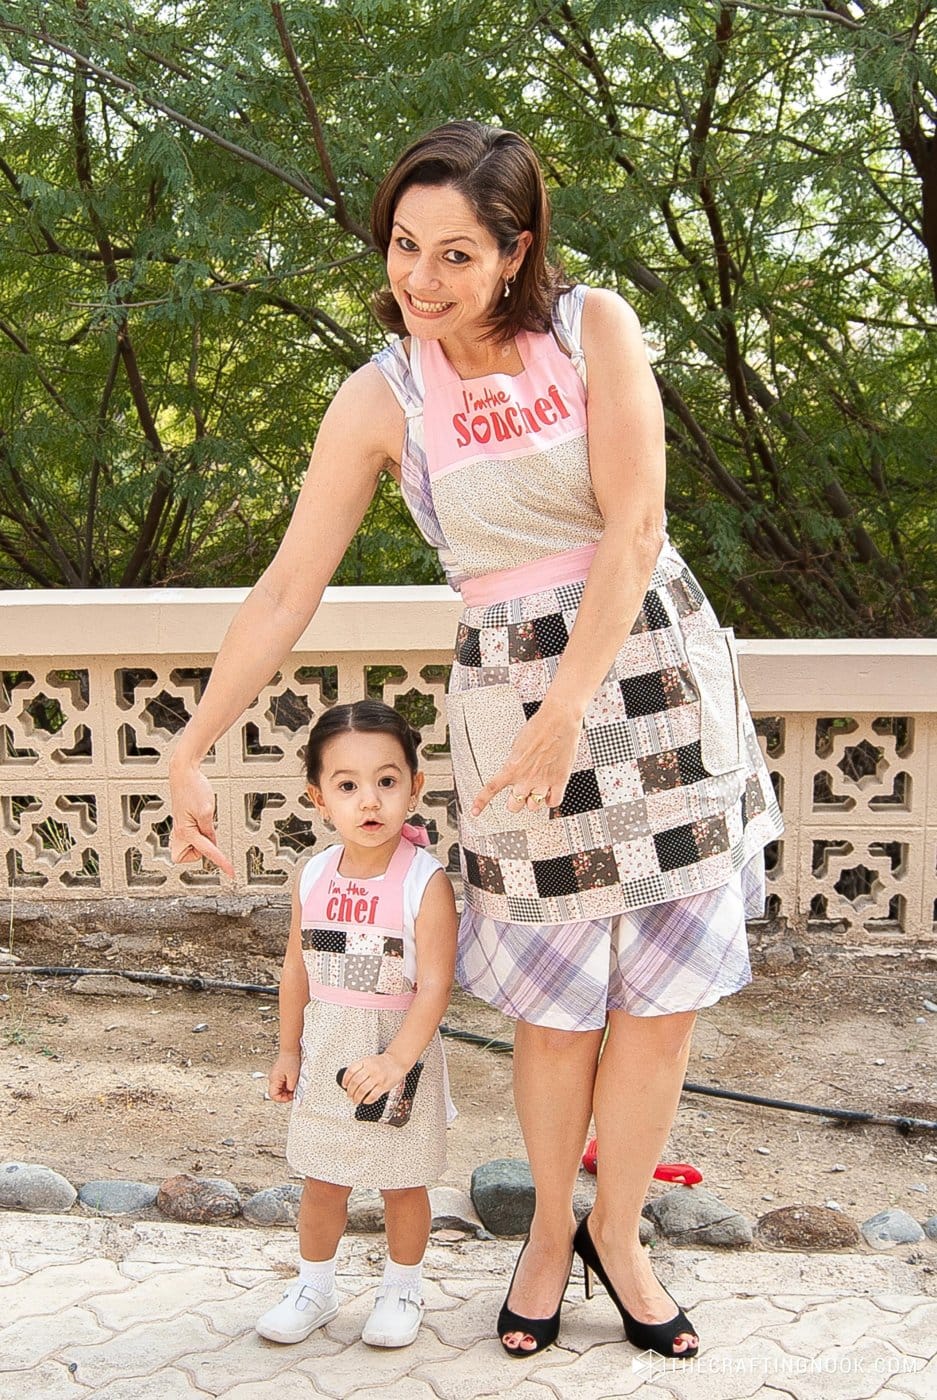
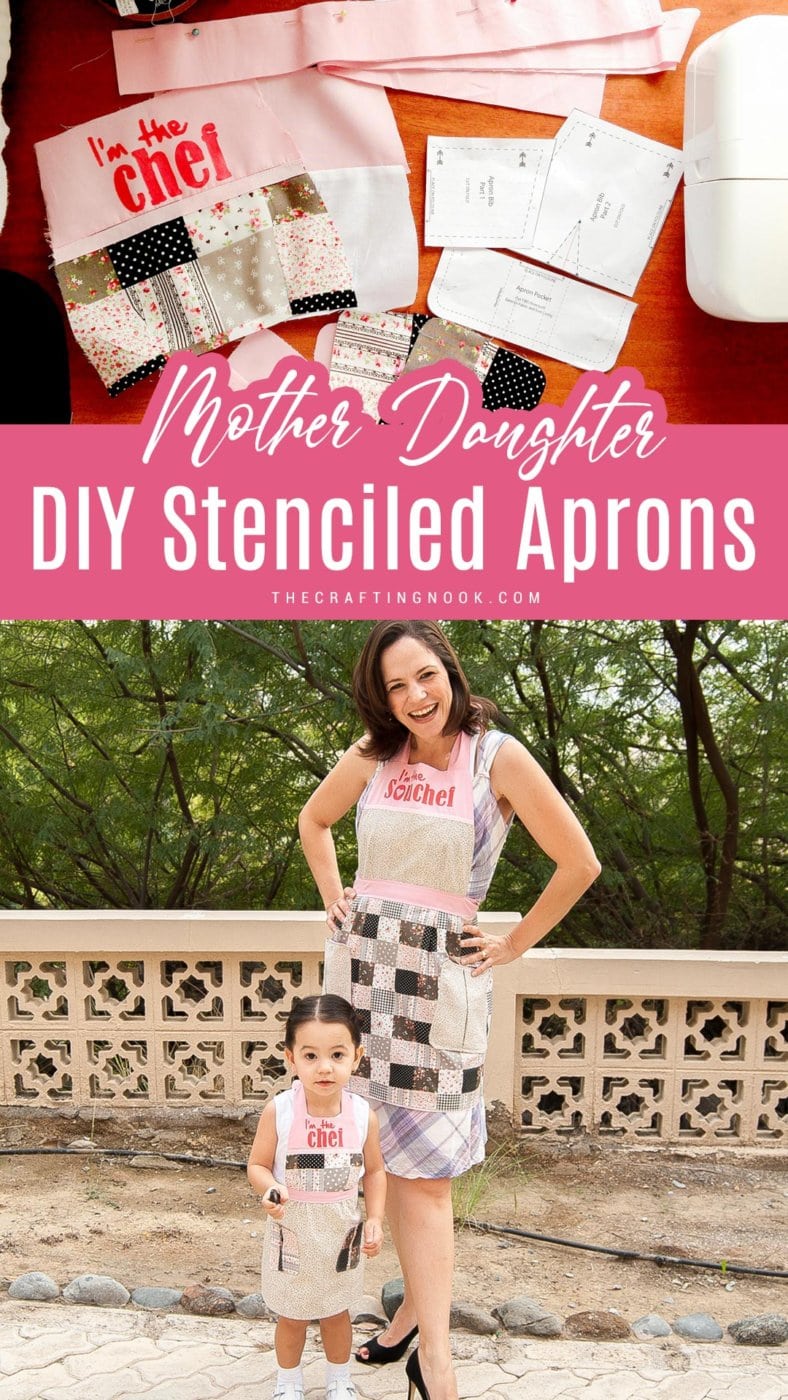
As you probably already noticed, I made a typo mistake. YUP! I was so caught up in the moment and inspiration (and eager to see the aprons finished) that I missed an “S” in the phrase Sous Chef. UGH!
Can you believe that?
I was so frustrated but I laughed so hard.

I could have, of course, re-made it but by the time I actually saw the mistake, I was about to finish the whole apron. So What I did was go back and fix the printable and the cut file and kept the apron as it was because I really loved it and it was for me anyways. If it were for anybody else I would have redone the top of bib for sure.
So, If you like this cute idea know that I FIXED THE PRINTABLE AND CUT FILES so you can download it and enjoy it without any typo.
How to Make Stenciled Mother Daughter Matching Aprons
To stencil these aprons I used the Freezer Paper stencil technique. It’s super simple to use if you have a cutting machine. If you don’t, you can get the cut files cut in vinyl for you online in places such as Etsy
Of course, you can always choose not to stencil the aprons and just use fun coordinated fabrics. It’s all about creativity.
Supplies:
- ¼ yard or one Fat Quarter of fabric 1: For the lower bib
- ½ yard of fabric 2: For the skirt
- ⅝ yard of fabric 3: for the upper bib, waist and neck ties
- ⅛ yard of lining fabric 4; I used white
- All-purpose thread to coordinate with fabrics:
- Fabric pen or pencil
- Fabric paint – I used hot pink but you can use your favorite color.
- Brush or foam brush
- Freezer paper
Tools:
- Cutting Machine – Such as Silhouette Cameo, Cricut or others
- Sewing machine
- Iron and ironing board
- Fabric scissors or rotary cutter and mat
- Straight pins
- Seam Ripper – In case you need to undo stitches.
Instructions:
The detailed step-by-step sewing tutorial for the main Apron can be found here and the Free apron sewing pattern can be found here. However, here I’ll teach you how to stencil the diy aprons and then how to transform the pattern into a smaller version to fit your child.
Step 1: Prep Work
Adult Apron:
1. Download, print, and cut the main apron pattern. DO NOT SCALE, PRINT AT 100%.
2. Cut out each pattern along the solid line and chose the option for cutting on the fold or cutting flat.
Fabric 1 (star fabric in my sample):
- Using the completed Apron Bib 2 pattern, cut ONE lower bib. Transfer the pattern markings for the darts to the fabric.
- Using the Pocket pattern, cut TWO pocket pieces. Transfer the pattern markings for the box pleats to the fabric.
Fabric 2 (floral plaid in my sample):
- Cut ONE 18″ high x 37″ wide rectangle (skirt).
Fabric 3 (Pink fabric in my sample):
- Using the completed Apron Bib 1 pattern, cut TWO upper bibs. The stencil design will be on ONE of the two bibs.
- Cut FOUR 2½” x 25″ strips
- Cut SIX 2½” x 31″ strips
- Using the Pocket pattern, cut TWO pocket pieces. Transfer the pattern markings for the box pleats to the fabric.
Fabric 4 (White linen fabric in my sample):
- Using the completed Apron Bib 2 pattern, cut ONE lower bib. Transfer the pattern markings for the darts to the fabric.

Child Apron
3. Download, print, and cut the main apron pattern. In this case, we’ll scale the pattern*.
- For kids 2-5 YO, scale the pattern (on print settings) to 60%
- For Kids 6-8 YO, scale the pattern (on print settings) to 70%
- For Kids 9-15 YO, scale the pattern (on print settings) to 85%
*Before starting to transfer the pattern to the fabric, do a text with the paper against your kid’s chest. adjust the percentage as needed.
4. Cut out each pattern along the solid line and chose the option for cutting on the fold or cutting flat.
Fabric 1 (star fabric in my sample):
- Cut ONE wide rectangle scaled according to the above examples (skirt).
Fabric 2 (floral plaid in my sample):
- Using the completed Apron Bib 2 pattern, cut ONE lower bib. Transfer the pattern markings for the darts to the fabric.
- Using the Pocket pattern, cut TWO pockets. Transfer the pattern markings for the box pleats to the fabric.
Fabric 3 (Pink fabric in my sample):
- Using the completed Apron Bib 1 pattern, cut TWO upper bibs. The stencil design will be on ONE of the two bibs.
- Cut FOUR scaled strips
- Cut SIX scaled strips
- Using the Pocket pattern, cut TWO pockets. Transfer the pattern markings for the box pleats to the fabric.
Fabric 4 (White linen fabric in my sample):
- Using the completed Apron Bib 2 pattern, cut ONE lower bib. Transfer the pattern markings for the darts to the fabric.
Stencil design
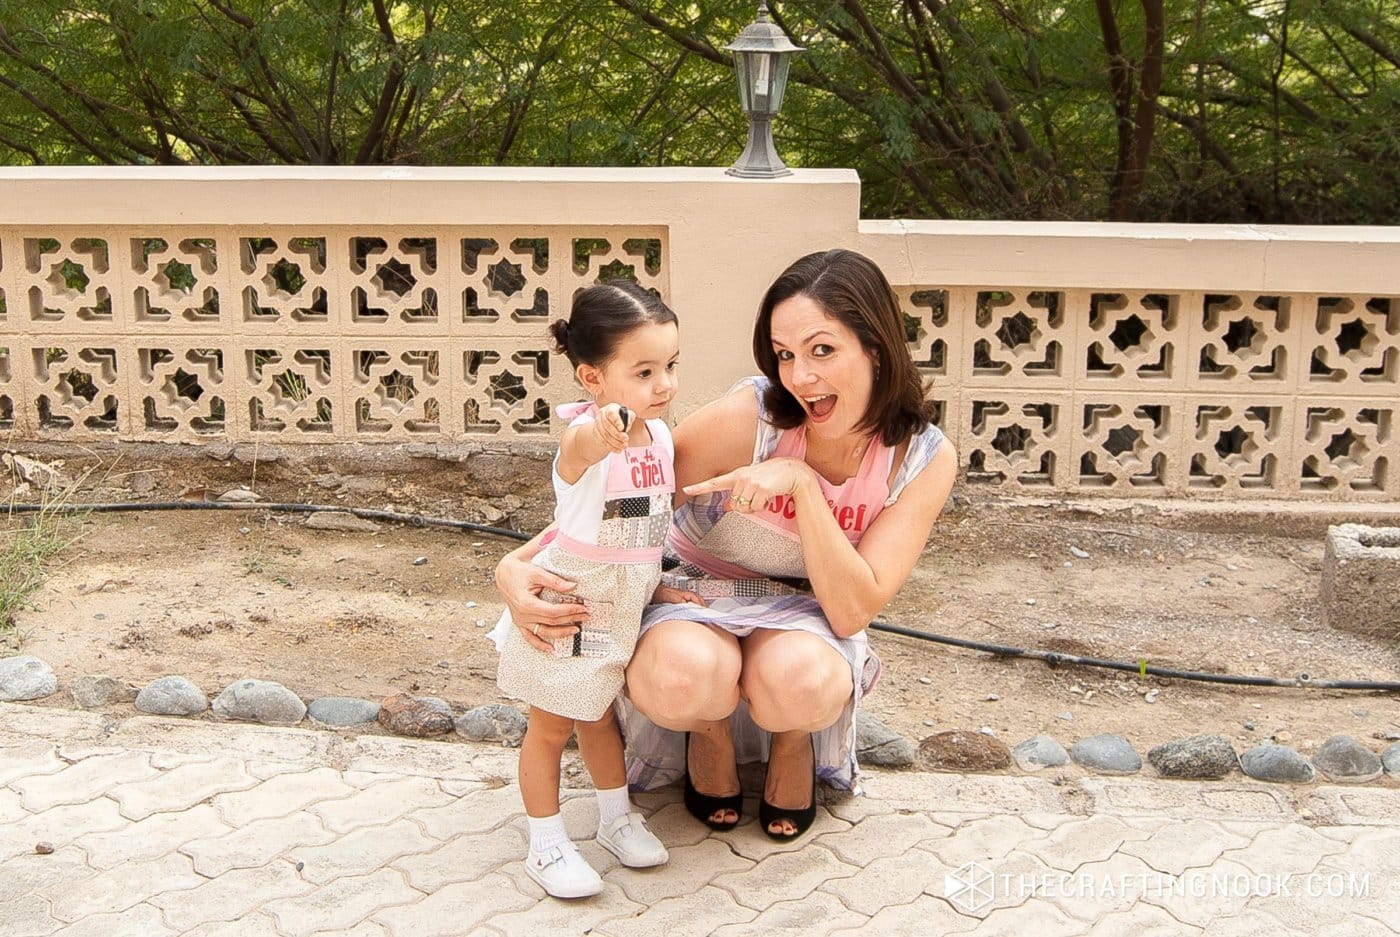
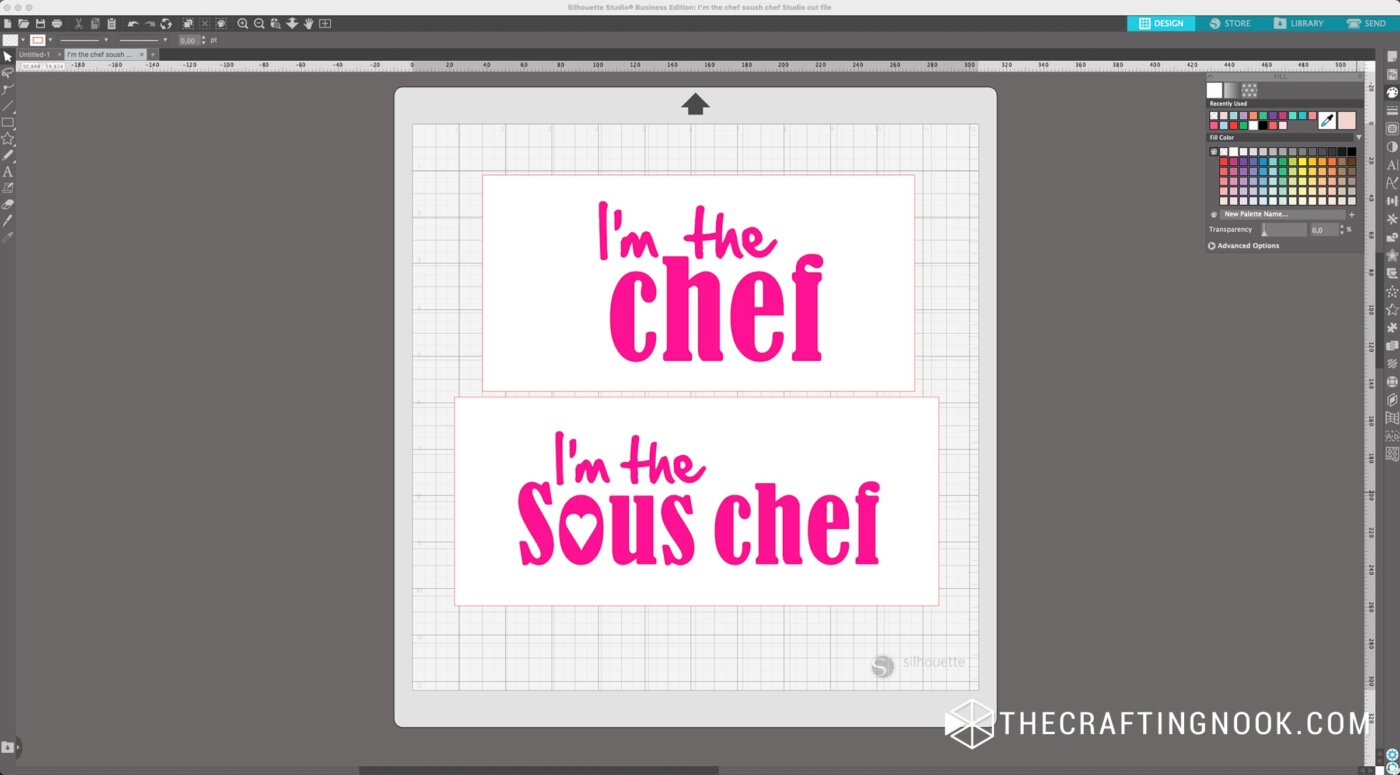
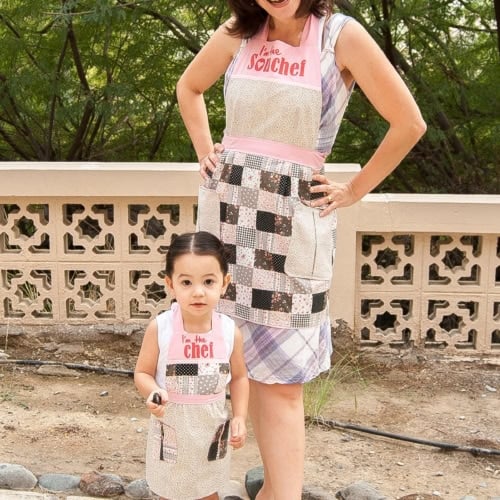
5. I wanted to paint some phrases on the upper bibs: “I’m the Chef” for Emma’s Apron and “I’m the sous chef” for mine.
So once I had the fabric pieces cut, using my Silhouette Studio app, I made the designs to fit the upper bibs. If you like them, you can Get the printables and cut Files HERE.
6. To cut it, open the files on your cutting machine app, in my case it’s Silhouette Studio. When using freezer paper, it’s important to make sure you mirror the design before sending it to cut.
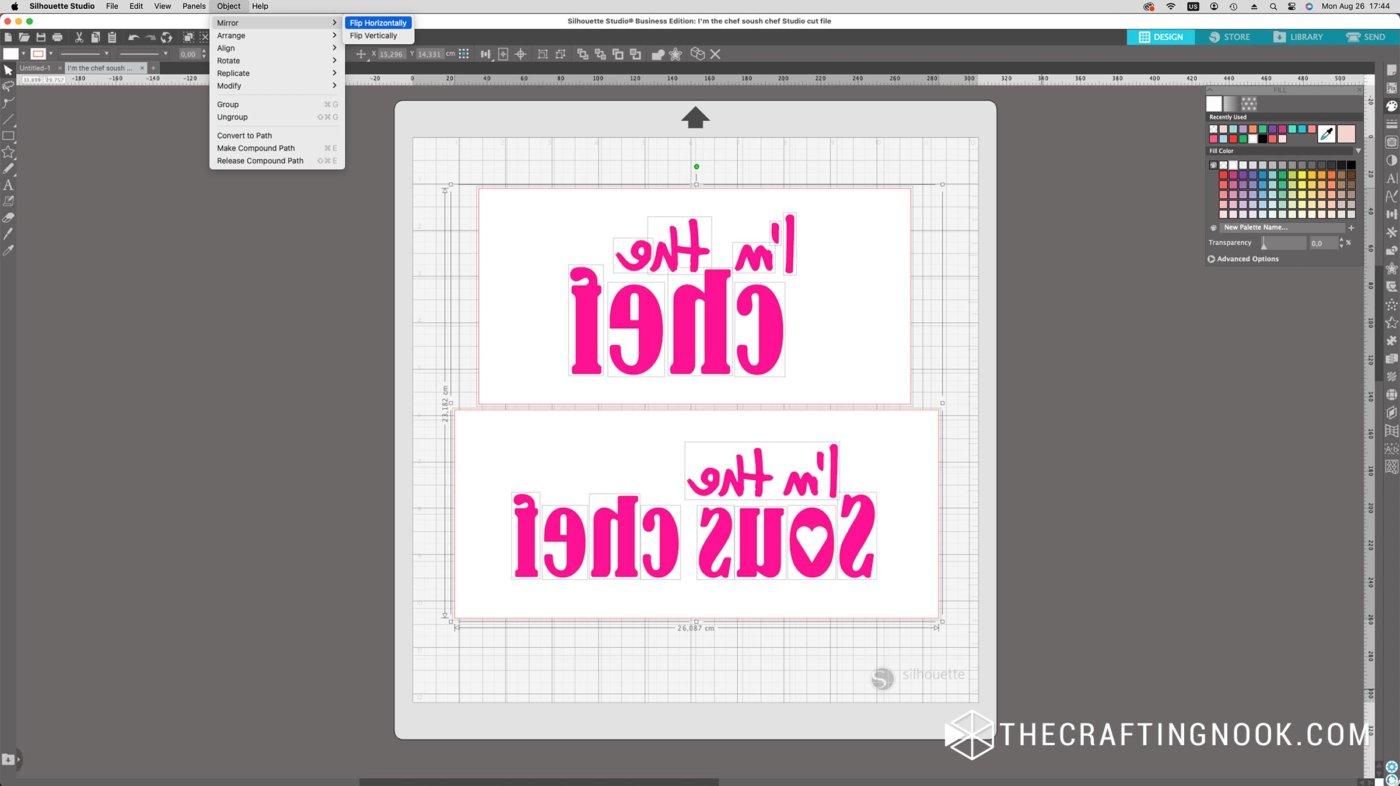
7. Also, make sure the waxed side of the freezer paper is facing up on your mat so the stickiness of the mat doesn’t damage the wax.
8. When using vinyl stencil material, you don’t need to mirror it. Just adjust as needed and send them to cut.
Step 2: Stenciling the Apron’s Bib
9. Before even starting to sew the apron I like to stencil any design first. The main reason is that if something goes wrong (and you catch it on time) you can just cut the piece again and re-do it instead of having to make a big part, or the entire apron.
10. Once the stencil has been cut, weed out the inner pieces of the design.
11. Make sure you leave the pinned pieces of a letter like the “e”, “o”, etc.

12. Tape your upper bib fabric to a piece of cardboard or a protected cutting mat so you don’t stain anything with the fabric paint.
13. Place the cutout freezer paper on the fabric as centered as possible.

14. Make sure to put in the right place the inner pieces of the letters.
Quick tip: For the O I made a heart inside, you can do this or use any other shape you like.
15. As you can see, here’s the typo I mentioned above but don’t worry the free files are fixed.

16. Paint your stencil with fabric paint. I wanted a dark warm pink so I mixed a bit of red, a drop of yellow a few drops of white.
17. I recommend always painting from the stencil towards the fabric to avoid the paint leaking in under the freezer paper.

18. Repeat the same process with the other apron.

19. When finished, let both dry well for a couple of hours.
20. Then peel off the freezer paper carefully.


21. To make sure your painted design stays vibrant after washing, allow the paint to dry completely, then heat-set it using an iron. Place a cloth or parchment paper over the painted area and iron it on a low to medium setting for a few minutes. Always follow the paint manufacturer’s instructions for best results.
Your two upper bibs are good and ready to go.
Step 3: Assembling the Aprons
22. I went back to the sewing. Here’s where I’ll show you some of the things I did differently than the original apron design.
23. I started with the bib. Stitched every piece for front and back following the instructions. Always respecting the seam allowance and pinning in place on every step so I could have an idea of how it was turning out.
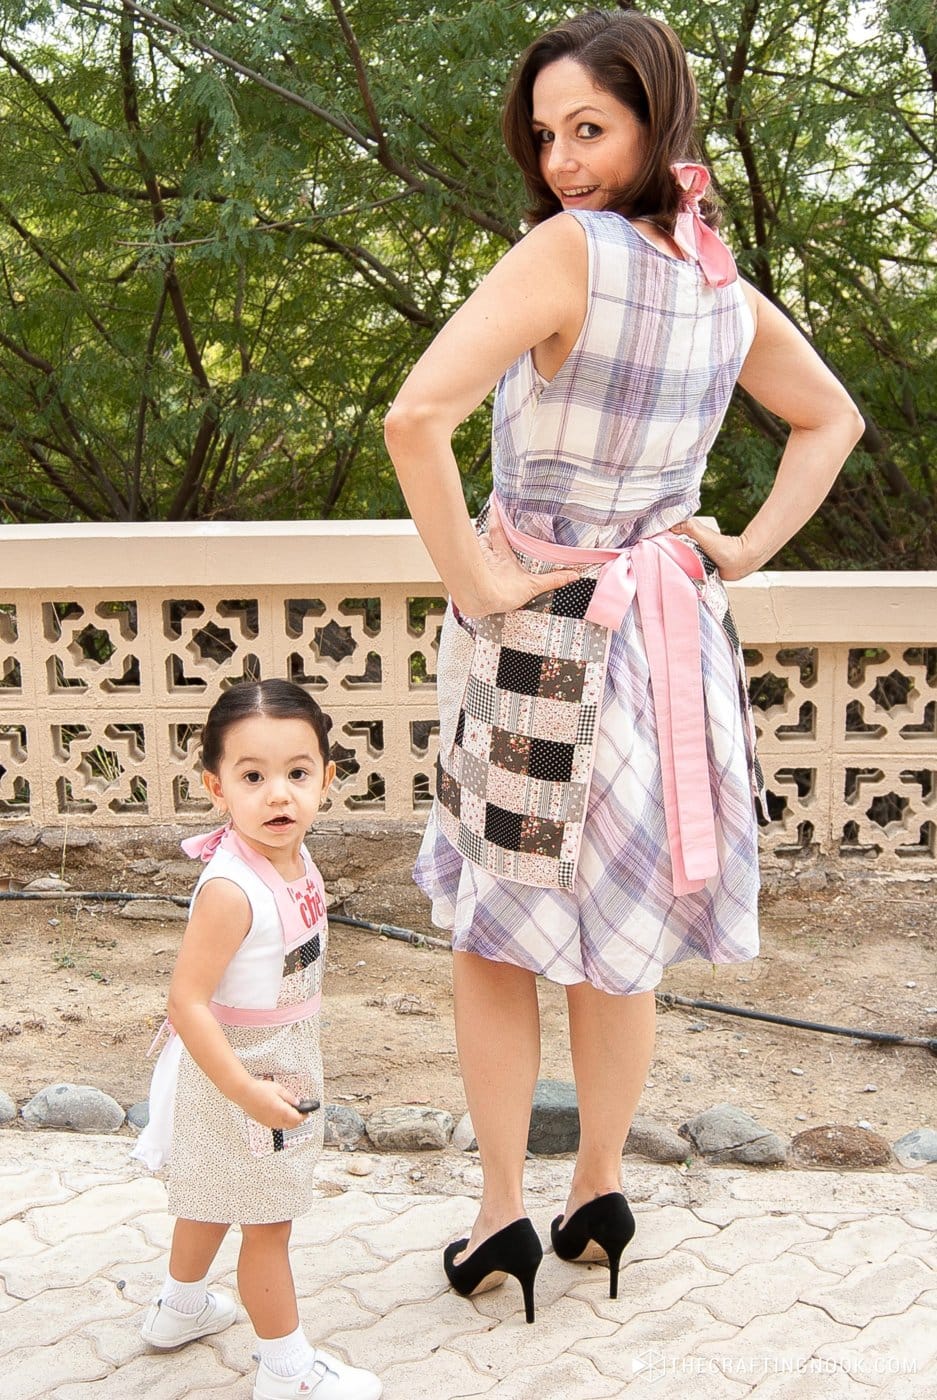
24. I used a strip of grosgrain ribbon to hide the union between both fabrics on the front side.

25. I pinned the neck straps on the front side and placed the front bib and lining bib right sides together.
26. Stitched front and back, using a ½” seam allowance along both sides and across the top. Left the bottom open for turning.

27. I turned the apron top right side out, pushed out the top corners and pulled up the ties.
28. Ironed well.

29. For the skirt, again I followed the original instructions but used grosgrain ribbon for the hem decoration.
30. Folding all the edges I placed the ribbon so it would be visible on the right side. Stitched all along the way.


31. I Stitched the pockets, which looked harder than it really was. but did not use any ribbon for them. They are so cute.

32. I positioned the pockets on the apron skirt. The pockets are 4½” from the upper edge.
33. They are designed to be set at a diagonal, so there is 10″ between the upper corners and 8″ between the lower corners.
34. I kept the group of three knife pleats to each side of the center along the upper edge of the apron skirt.
35. Then I prepared the waistband and waist tie pieces. This part is so well explained with graphics and pictures on the original tutorial that it’s hard to get lost. I suggest following it to the T.

36. I stitched the whole waistband and waist ties and the Apron as literally done!
37. As soon as I finished my Stenciled Apron Pattern, I started with Emma’s.
I used the bib and measured approximately from where to where it goes in my body and measured the same spot in my girl. I could proportionally reduce it to my girl’s size which was about 50%.

Each part was reduced using the rule of three to get exact proportions.

Repeat the exact process used on the adult apron but use the fabric differently so it would be coordinated.

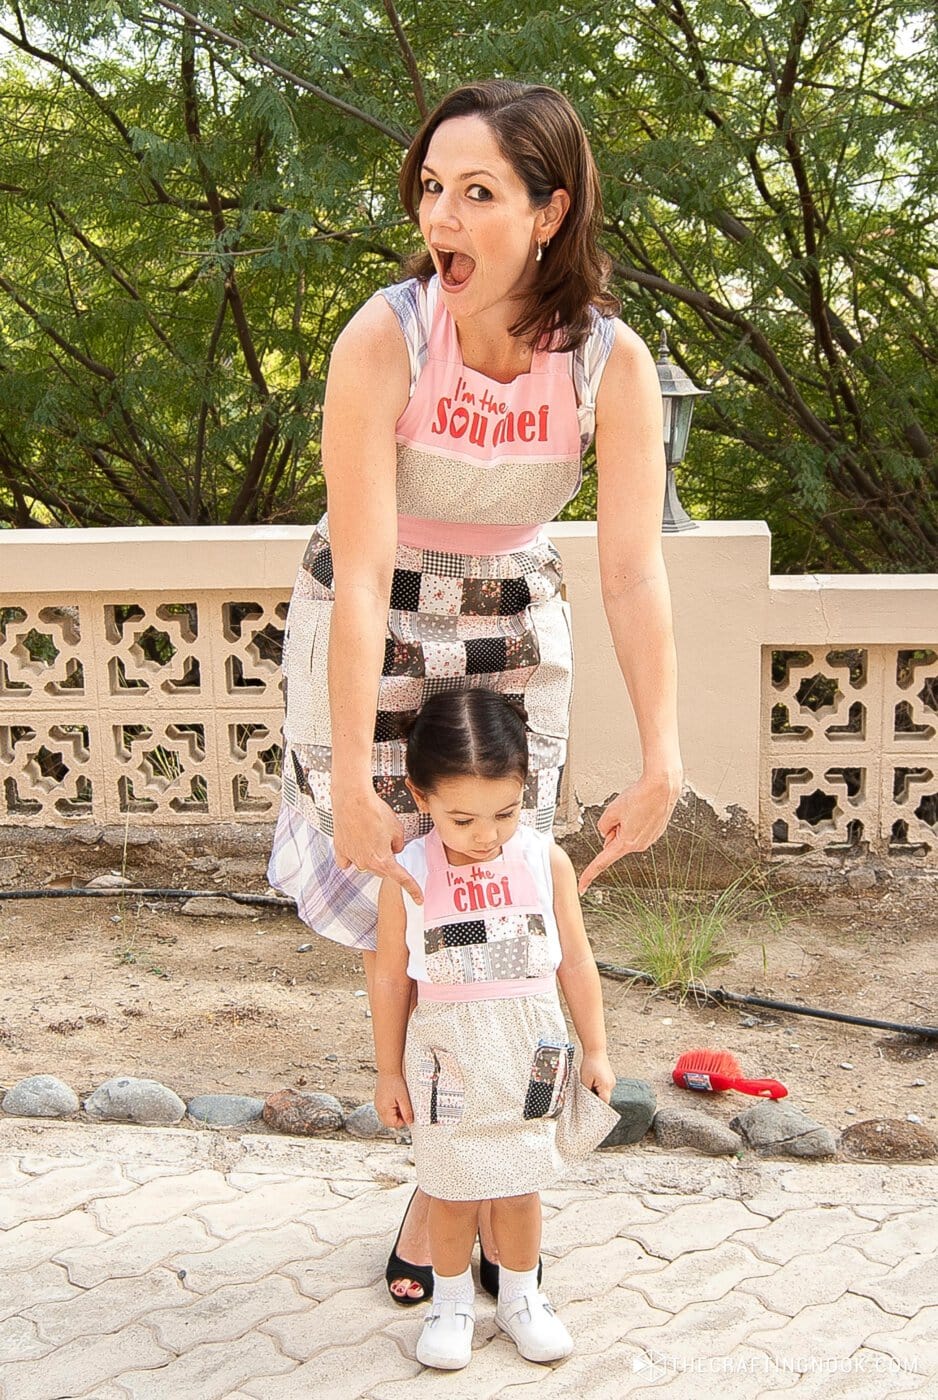
Tadaaaaa! We have a matching and coordinated Stenciled Apron Pattern, Yayyyy!


I’m very happy with the final result and Emma loved it too. When I tried to take it out she wouldn’t let me HAha.
Crafting Tips
- Choose fabrics themed for different seasons or holidays. For example, use Christmas-themed fabric for a festive cooking session or floral prints for spring.
- You could make this apron reversible by using two different fabrics, one for each side of the apron, so you can flip the apron for a new look whenever you want.
- Instead of the grossgrain ribbon, Add a ruffle or lace trim around the edges of the apron for a more feminine touch.
So, I hope you like it as much as I did and here I leave you some pics we took… Uhm well ok, she took LOL. We had some fun there.
Alternatives and Substitutions
- Canvas or Denim: For a sturdier, more durable apron, choose canvas or denim fabric. This is perfect for heavy-duty use, such as baking or crafting.
- Seasonal Fabrics: Choose themed fabrics based on the season or holiday (e.g., floral prints for spring, plaid for Christmas, or pumpkins for Halloween).
- Recycled Materials: Upcycle old jeans, curtains, or tablecloths into aprons to create a unique, eco-friendly project.
- Custom Stenciling: Instead of phrases like “I’m the Chef” and “I’m the Sous Chef,” use other fun phrases like “Baking Queen” and “Junior Chef” or personalized names.
- Fabric Paint Colors: Use metallic or glitter fabric paints for a bit of sparkle. Experiment with different colors to match kitchen decor or favorite hues.
- Embellishments: Add embellishments like lace trims, pom-pom edging, or fabric flowers for a more decorative look. You can also sew on buttons or patches for extra charm.
- Applique Designs: Instead of stenciling, use applique to add cute shapes or designs (e.g., cupcakes, fruits, or animals) to the apron for a fun, playful touch.
- Embroidery: Hand or machine embroider designs or names onto the apron for a more traditional and detailed look.
- Tie-Dye or Ombre: Use fabric dye techniques like tie-dye or ombre for a colorful, trendy apron.
Frequently Asked Questions
The best fabric for aprons is medium-weight cotton or cotton blends, as they are durable and easy to sew. You can also use canvas or denim for a sturdier apron or laminated cotton for a waterproof option. Choose a fabric that matches the intended use and your style preference.
To adjust the pattern for different sizes, measure the person who will wear the apron and compare those measurements to the pattern. You can scale the pattern up or down proportionally. For children’s aprons, you can reduce the pattern by a specific percentage during printing, or use systems like the rule of three based on the bib’s height.
Freezer paper is used to create a stencil because it temporarily adheres to the fabric when ironed, providing a clean, crisp edge for your painted design. It also prevents paint from bleeding under the stencil, giving you sharp lines and professional-looking results.
To make sure your painted design stays vibrant after washing, allow the paint to dry completely, then heat-set it using an iron. Place a cloth or parchment paper over the painted area and iron it on a low to medium setting for a few minutes. Always follow the paint manufacturer’s instructions for best results.
Absolutely! You can use Heat transfer vinyl decal, applique, embroidery, or fabric markers for your designs. Each method offers a unique look and requires different materials and skills, so choose the one you’re most comfortable with or want to learn.
The time it takes to complete the project depends on your sewing skill level and the techniques used. For beginners, it may take around 2-3 hours per apron, including cutting, sewing, and stenciling. More experienced sewists might complete it faster.
More Sewing Projects To Try
If you liked this DIY Mother Daughter Stenciled Apron Pattern idea, you might also love these other sewing projects too:
Want to Check Out More Silhouette Projects?
My Silhouette Challenge buddies and I are all sharing projects on our blogs today, so peruse the projects below for a wealth of Silhouette inspiration!
- No-Sew Interchangeable Fabric Bunting by unOriginal Mom
- Monogrammed Burlap Garden Flag by The Turquoise Home
- Crawl, Walk, Bike by It’s Always Craft Time
- Freezer Paper Stenciled Tote Bags by Weekend Craft
- DIY Bleach Spray Shirt by Practically Functional
- Felt Star Wands by Cutesy Crafts
- Yoda Kid’s T-Shirt by Architecture of a Mom
- Big Sister Gift & Silhouette Cut File by Creative Ramblings
- Nerdy Baby Onesies + Free Cut File by Essentially Eclectic
- Easy Easter Bunny Onesie – Silhouette Cameo Craft by Adventures in All Things Food & Family.
- Hearts-A-Lot Burlap Pillow Cover by My Paper Craze
- Baby Quilt by Dragonfly & Lily Pads
- “Team Betty” Tote Bag by The Thinking Closet
- Easy Heart Appliqued Onsies by Create & Babble
- DIY Screen Printed Curtains by Chicken Scratch NY
- Fabric Painted Quilted Wall Hanging by Terri Johnson Creates
- DIY Monogrammed T-shirts with Silhouette Heat Transfer Material by Pitter and Glink
- Birthday Challenge by Fadville
- Fabric Applique Valentine’s Day T-Shirt by DailyDwelling
- “Cute as Cupid” shirt by crafts, cakes, and cats
- Sew Cute Applique by Life After Laundry
- Customizing textiles with Heat Transfer Vinyl (working title) by feto soap
- Lady Bug Tote Bag with Silhouette Rhinestones by Ginger Snap Crafts
- Canvas sketch project and a share by Clever Someday
✂️ Tutorial
DIY Mother Daughter Stenciled Apron Pattern
Tools
- Cutting Machine – Such as Silhouette Cameo, Cricut or others
- Sewing Machine
- Iron and ironing board
- Scissors or rotary cutter and mat
- Straight pins
- Seam Ripper – In case you need to undo stitches.
Supplies
- ¼ yard or one Fat Quarter of fabric 1: For the lower bib
- ½ yard of fabric 2: For the skirt
- ⅝ yard of fabric 3: for the upper bib waist and neck ties
- ⅛ yard of lining fabric 4; I used white
- All-purpose thread to coordinate with fabrics:
- Fabric pen or pencil
- Fabric paint – I used hot pink but you can use your favorite color.
- Brush or foam brush
- Freezer paper
Instructions
- The detailed tutorial to sew the main Apron can be found here and the Free pattern can be found here. However, here I’ll teach you how to stencil the aprons and then how to transform the pattern into a smaller version to fit your child.
Step 1: Prep Work
- Adult Apron:
- Download, print, and cut the main apron pattern. DO NOT SCALE, PRINT AT 100%. Cut out each pattern along the solid line and chose the option for cutting on the fold or cutting flat.
- Fabric 1 (star fabric in my sample):
- Using the completed Apron Bib 2 pattern, cut ONE lower bib. Transfer the pattern markings for the darts to the fabric.
- Using the Pocket pattern, cut TWO pockets. Transfer the pattern markings for the box pleats to the fabric.
- Fabric 2 (floral plaid in my sample):
- Cut ONE 18″ high x 37″ wide rectangle (skirt).
- Fabric 3 (Pink fabric in my sample):
- Using the completed Apron Bib 1 pattern, cut TWO upper bibs. The stecil desig will be on ONE of the two bibs.
- Cut FOUR 2½” x 25″ strips
- Cut SIX 2½” x 31″ strips
- Using the Pocket pattern, cut TWO pockets. Transfer the pattern markings for the box pleats to the fabric.
- Fabric 4 (White linen fabric in my sample):
- Using the completed Apron Bib 2 pattern, cut ONE lower bib. Transfer the pattern markings for the darts to the fabric.
- pieces of cut fabric and paper DIY Stenciled Apron Pattern
- Child Apron
- Download, print, and cut the main apron pattern. In this case, we’ll scale the pattern*.
- For kids 2-5 YO, scale the pattern (on print settings) to 60%
- For Kids 6-8 YO, scale the pattern (on print settings) to 70%
- For Kids 9-15 YO, scale the pattern (on print settings) to 85%
- *Before starting to transfer the pattern to the fabric, do a text with the paper against your kid’s chest. adjust the percentage as needed.
- Cut out each pattern along the solid line and chose the option for cutting on the fold or cutting flat.
- Fabric 1 (star fabric in my sample):
- Cut ONE wide rectangle scaled according to the above examples (skirt).
- Fabric 2 (floral plaid in my sample):
- Using the completed Apron Bib 2 pattern, cut ONE lower bib. Transfer the pattern markings for the darts to the fabric.
- Using the Pocket pattern, cut TWO pockets. Transfer the pattern markings for the box pleats to the fabric.
- Fabric 3 (Pink fabric in my sample):
- Using the completed Apron Bib 1 pattern, cut TWO upper bibs. The stencil design will be on ONE of the two bibs.
- Cut FOUR scaled strips
- Cut SIX scaled strips
- Using the Pocket pattern, cut TWO pockets. Transfer the pattern markings for the box pleats to the fabric.
- Fabric 4 (White linen fabric in my sample):
- Using the completed Apron Bib 2 pattern, cut ONE lower bib. Transfer the pattern markings for the darts to the fabric.
- Stencil design
- I wanted to paint some phrases on the upper bibs: “I’m the Chef” for Emma’s Apron and “I’m the sous chef” for mine.
- So once I had the fabric pieces cut, using my Silhouette Studio app, I made the designs to fit the upper bibs. If you like them, you can Get the printables and cut Files HERE.
- To cut it, open the files on your cutting machine app, in my case it’s Silhouette Studio. When using freezer paper, it’s important to make sure you mirror the design before sending it to cut.
- Also, make sure the waxed side of the freezer paper is facing up on your mat so the stickiness of the mat doesn’t damage the wax.
- When using vinyl stencil material, you don’t need to mirror it. Just adjust as needed and send them to cut.
Step 2: Stenciling the Apron’s Bib
- Before even starting to sew the apron I like to stencil any design first. The main reason is that if something goes wrong (and you catch it on time) you can just cut the piece again and re-do it instead of having to make a big part, or the entire apron.
- Once the stencil has been cut, weed out the inner pieces of the design.
- Make sure you leave the pinned pieces of a letter like the “e”, “o”, etc.
- Tape your upper bib fabric to a piece of cardboard or a protected cutting mat so you don’t stain anything with the fabric paint.
- Place the cutout freezer paper on the fabric as centered as possible.
- Make sure to put in the right place the inner pieces of the letters.
- Quick tip: For the O I made a heart inside, you can do this or use any other shape you like.
- As you can see, here’s the typo I mentioned above but don’t worry the free files are fixed.
- Paint your stencil with fabric paint. I wanted a dark warm pink so I mixed a bit of red, a drop of yellow a few drops of white.
- I recommend always painting from the stencil towards the fabric to avoid the paint leaking in under the freezer paper.
- Repeat the same process with the other apron.
- When finished, let both dry well for a couple of hours.
- Then peel off the freezer paper carefully.
- To make sure your painted design stays vibrant after washing, allow the paint to dry completely, then heat-set it using an iron. Place a cloth or parchment paper over the painted area and iron it on a low to medium setting for a few minutes. Always follow the paint manufacturer’s instructions for best results.
- Your two upper bibs are good and ready to go.
Step 3: Assembling the Aprons
- I went back to the sewing. Here’s where I’ll show you some of the things I did differently than the original apron design.
- I started with the bib. Stitched every piece for front and back following the instructions. Always respecting the seam allowance and pinning in place on every step so I could have an idea of how it was turning out.
- I used a strip of grosgrain ribbon to hide the union between both fabrics on the front side.
- I pinned the ties on the front side and placed the front bib and lining bib right sides together.
- Stitched front and back, using a ½” seam allowance along both sides and across the top. Left the bottom open for turning.
- I turned right side out, pushed out the top corners and pulled up the ties.
- Ironed well.
- For the skirt, again I followed the original instructions but used grosgrain ribbon for the hem decoration.
- Folding all the edges I placed the ribbon so it would be visible on the right side. Stitched all along the way.
- I Stitched the pockets, which looked harder than it really was. but did not use any ribbon for them. They are so cute.
- I positioned the pockets on the apron skirt. The pockets are 4½” from the upper edge.
- They are designed to be set at a diagonal, so there is 10″ between the upper corners and 8″ between the lower corners.
- I kept the group of three knife pleats to each side of the center along the upper edge of the apron skirt.
- Then I prepared the waistband and waist ties. This part is so well explained with graphics and pictures on the original tutorial that it’s hard to get lost. I suggest following it to the T.
- I Stitched the whole waistband and waist ties and the Apron as literally done!
- As soon as I finished my Stenciled Apron Pattern, I started with Emma’s.
- I used the bib and measured approximately from where to where it goes in my body and measured the same spot in my girl. I could proportionally reduce it to my girl’s size which was about 50%.
- Each part was reduced using the rule of three to get exact proportions.
- Repeat the exact process used on the adult apron but use the fabric differently so it would be coordinated.
- DIY Mother Daughter Stenciled Apron Pattern ready on the back of a chair
- Tadaaaaa! We have a matching and coordinated Stenciled Apron Pattern, Yayyyy!
Share and PIN ME!!!
Til’ next time…


FREE WORKBOOK
Keeping your Sweet Home Organized
Learn how to create intentional habits and simple routines to Keep Your Home Organized. Plus freebies, printables, exclusive content, and tips.
Disclaimer: By clicking on the “Yes” button above you are giving me your consent to collect and use your information according to the law and My Policy Privacy. Zero Spam I promise!
Those aprons are adorable!! but I think the photo shoot is even more adorable! Thank you for sharing this on Foodie Friday
These are too cute!!! And great photos! Stopping by to pin this and let you know I featured it on my blog today!
Such cute photos and Aprons! =) You did a wonderful job in making the aprons!Stopping by from “Treasure Box Tuesday”!
Your aprons are absolutely adorable! Love the fabrics you chose. They are so colorful and fun.
These are a great project/craft. Your daughter is adorable. I’m sure she loved having a special apron, just like mommy. I’m stopping by from the Let’s Get Real Friday party. Thanks so much for sharing this and linking up with us. I hope you’ll join us again on Friday.
You guys are just too adorable. I don’t have daughters but remember when my sons were young and liked to help in the kitchen, I gave them each their own apron and they loved it.
These are fantastic! Thank you for sharing them with Treasure Box Tuesday- they are being featured at our next party (2/25)! :)
So adorable! My girl’s would die with matching ones! Thanks for linkin up to Sunday FUNday!
TOO adorable! I was wish I was capable of making something like this. Your little girl is absolutely precious!Cindy at Notes in the Key of Life
These are SUPER cute! I love them!
Wow, Cami, what a great post. THANK YOU for sharing it on my blog hop! I love it. PInning all over the place. I have personalized aprons with my granddaughter. Mine says Grandma and hers says “Me”. So much fun.
Great project and awesome tutorial! Thanks for sharing! BTW, I love your blog!
These are SO adorable!!! And I love that you are wearing heals with your apron! :)
Hi,
Saw your post at Sew Can Do Craftastic Monday Link Party 2/16/14. I really love mother daughter outfits. My mom and I used to have matching dresses for Mother’s Day back in the early 1960s. Made my daughter and her kiddos matching outfits for Mother’s Day last year:). Excellent post.
Reecea
http://freshjuniper.blogspot.com
These are so cute! I’d love it if you came and shared at the Do Tell Tuesday party at mabeyshemadeit.com
These aprons are beyond cute!Navy Wifey Peters @ Submarine Sunday Link Party
Oh my gosh! These are super cute! I love that she is the Chef. Thanks for linking it up to Snickerdoodle Sunday!
You lovely ladies are featured this week at Snickerdoodle Sunday! http://2crochethooks.com/snickerdoodle-sunday-linkup-19/
They are adorable and I LOVE the fabric! Thanks for sharing them with us Sewlicious Home Decor! Marti
These aprons are adorable Cami! What a special thing you can wear together! My daughter would love to have a matching apron with me. I love the silly photos you two took–so glad you included those in the post!
Super cute! Pinned!!!
These are lovely and i just love all your pictures – what fun!!
These aprons are adorable!! The photo shoot is too cute!!
Wow, these are really really great!! Something you both will be able to use (and cherish) for a long time! Nice job!!
Totally adorable! I love the fonts you chose! Love the photo shoot too!
Adorable! Aprons has on my “to sew” list for over a year and I have yet to do them still! They look great!
Love this! But I love everything you do. Silly question here. I just got a Cameo and since I was too excited to use it I didn’t read that the vinyl didn’t need to go on the matt (yikes) I think I will have to toss the mat because I can’t get all the paper off. Does the Freezer paper go in without the mat too?
Love this! But I love everything you do. Silly question here. I just got a Cameo and since I was too excited to use it I didn’t read that the vinyl didn’t need to go on the matt (yikes) I think I will have to toss the mat because I can’t get all the paper off. Does the Freezer paper go in without the mat too?
Visiting from the February Fabric Silhouette Challenge!
I totally need an apron in my house, as I’m such a messy cook ha! Gah your mini-photoshoot is so stinkin adorable!! And the coordinating sayings- sooo creative!
Very cute project and the photo session looks like a lot of fun. Thanks for sharing.
Oh, these are just adorable! I love the aprons, and your added wording is just perfect! Great job…are you sure these are the first you’ve made?